ReactiveCocoa From the Ground Floor, Part 2
In the first part of the tutorial, we covered the core concepts of ReactiveCocoa and took a high level overview of the framework, and the concepts needed to be able to use it effectively. Now with that out of the way, we will dive into some more concrete examples and actually get to some code!
So lets expand on the example from the first tutorial of the text field the lets the user know if it is valid or invalid in real-time. So in a real world use case, you will most likely have more than one text field, and you will also have a button that the user should tap whenever the text fields are filled out that will do something like log them in or register them. So for our example we will do what would be a simple registration form with a login button that will perform a network request when tapped. We will have:
- A text field for the user’s name.
- A text field for their email address.
- A text field for their password.
- A button that “logs in” the user.
And we want to let the user know in real time if each text field is valid or invalid, so next to each field we will display a red start for invalid, and a green start for valid. We also want the button to only be enabled whenever all of the forms are valid, and we want this to update in real-time as well. So lets get to the code!
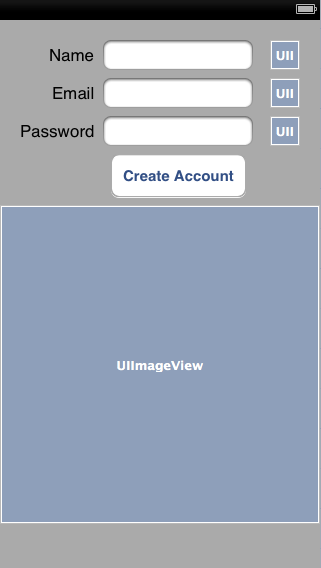
First, open Xcode and choose the “Single View” template. Then, using Cocoapods install ReactiveCocoa. Once that is set up, open up your Storyboard and set up the interface as is shown below.
And then hook everything up in the .m file and import ReactiveCocoa and EXTScope. Don’t forget the handy GreenStar and RedStar macros at the top!
1 2 3 4 5 6 7 8 9 10 11 12 13 14 15 16 17 18 19 | |
EXTScope.h provides some helpful macros for avoiding retain cycles, and we will cover those when we get there. Now for the fun stuff.
1 2 3 4 5 6 7 8 9 10 11 12 13 14 15 16 17 18 19 20 21 22 23 | |
So after assigning the delegates, we use the rac_textSignal property that ReactiveCocoa provides on UITextField that gives us a signal that sends a next event each time each time the text in the text field is modified, so we will know exactly what the user enters as they enter it. Then we use the map: function and return a BOOL that indicates if the field is valid or not. Here we use arbitrary length’s (and check for the “@” character in the email field) to determine validity, but you could use whatever you want.
The map: function returns a signal, so we get a signal from each mapping, and we will use those signals to set the image views to the correct image. Here we use the GreenStar and RedStar macros declared earlier to set the image.
1 2 3 4 5 6 7 8 9 10 11 12 13 | |
Each time the user enters a something on one of the text fields, the respective signal received from the previous mapping will be sent the BOOL value as a next event. So here, what we do is use the handy map: function again, and if the value is true (indicating the field is valid) we return a green star, or if it is false we return a red star. Then we use the RAC macro to bind each image views image property to the value of the signal that is returned from the map: function. So every time nameSignal, emailSignal, or passwordSignal receive a next event, which is each time the user enters or removes a character from the text field, the respective image view will be updated.
So right here, with this very little bit of code we have text fields that will indicate their validity to the user in real-time. Now lets move on to the button. We want the button to only be enabled when all of the text fields are valid, and again, ReactiveCocoa makes this incredibly easy.
1 2 3 4 5 | |
There is a super handy class method on RACSignal called combineLatest: reduce:, and what combineLatest: reduce: does is take an array of signals and combine them into a single signal that will send the lastest value from each of the signals in the array passed as a parameter. then the reduce: method takes a block that will be sent the lastest values from the combined signals, which here would be an NSNumber wrapped BOOL. So we simply reduce all of those values to a single BOOL value that indicates when all of the text fields are valid, and the we return that and get a new signal that indicates the validity of the text fields.
Now we can move into setting up the button:
1 2 3 | |
For the button, instead of setting a target/action pair in order to call a method, we will use a RACCommand. A command is simply a signal that is triggered in response to some event, such as a button press, and is generally used to replace target action pairs on UIButtons or UIBarButtonItems. So we instantiate the command with the commanfWithCanExecuteSignal: method, and what this does it take a signal that returns a BOOL, and it sets the commands canExecute property with the value received from that signal. This will come in handy in a bit.
Now we need to set up the action that will be performed whenever the user taps the button. So we will take the command and use the addSignalBlock: method.
1 2 3 4 5 6 7 8 9 | |
The addSignalBlock: method requires that a RACSignal be returned from it, so we use the RACSignal class method start:, which returns a signal, and we return that. Then we do our work inside the block that is passed as a parameter to the start: method. All we want to do when the button is tapped is make a network request and fetch a picture, so we simply grab a NSData object from a URL and turn that into a UIImage and return it. Now before we go on, take notice of the line of code: *success = (data != nil);. What he have here is a pointer to a BOOL, and if that BOOL gets set to NO then the signal will send an NSError rather than the UIImage that we want.
Now we need to make sure we handle the error, and the way we do that is like so:
1 2 3 4 5 6 7 8 9 | |
Here we map: the commandSignal, which will be giving us RACSignal, then we use catch on that signal, which will do just like it says and catch any errors that the signal sends, then we simply log the error and return [RACSignal empty], which is a signal of nothingness. So what this does is prevent an error from making it any farther than this and possibly getting sent to something that is not expecting it. That is why we use [RACSignal empty], so if there is an error, anything further down the line that is expecting a value from this signal won’t receive an NSError object when it is expecting something else, which could cause a crash.
Now lets hook this command up to our button.
1 2 3 | |
ReactiveCocoa gives UIbutton a method called rac_signalForControlEvents: that will produce a signal that sends a next event each time the control event is recognized. We want the button to execute the command we set up, so we simply pass the command to the executeCommand: method of the buttonSignal. Now each time that buttonSignal sends a next event, it will execute the code in the commands addSignalBlock: method.
1 2 3 4 5 6 7 8 | |
Now we get to use the macros provided by EXTScope. @weakify(self) and @strongify(self) is just syntactic sugar for preventing retain cycles on self. So we simply use @weakify(self) once before a block where we need to reference self, and then use @strongify(self) any other time we reference self inside a block to prevent self from getting de-allocated early. The rest is just clean up, as we want to make sure all the keyboards are dismissed whenever the button is pressed. So we simply dismiss the keyboard whenever buttonSignal sends a next event.
Now the button is set up, and it will fire the command, whenever it is tapped, and the command will only execute when all the text fields are valid, but we need to hook up the button to be enabled or disabled depending on the validity of the fields, and to do that all we have to do is this:
1 2 3 4 5 | |
We use the RACAbleWithStart macro to create a signal based on the canExecute property of the command, then we use deliverOn: in order to make sure the signal is sent on the main thread, since we are binding to a UIKit property, and doing anything with UIKit off of the main thread is a no-no. Using RACAbleWithStart with send a signal with the starting value of whatever is passed into it, so here we want to start with the value of the commands canExecute property, which will be NO whenever the view is first loaded, since all the text fields start out invalid.
So now the button is hooked up and will fire off its command, so lets do something with the results of that command. Since we get an image, lets display it to the user.
1 2 3 4 5 | |
Here we take commandSignalMapped and apply the flatten method to it. We need to do this because commandSignalMapped is a signal of signals, and flatten takes a signal of signals and flattens, or merges, it into a new signal that represents the value of all of the signals. So we bind the image property of the imageView to the signal from the flattening of the commandSignalMapped, which will send the image that we fetch when the button is tapped. Note again the use of deliverOn: since we are binding to UIKit.
Now everything is hooked up and will function just like we want it to and we have not crested 100 lines of code! Now lets do one final thing, lets set up an activity indicator to indicate to the user that we are processing the “registration”.
1 2 3 4 5 6 7 | |
Here we just set up an activity indicator as we normally would. Then what we want to do is have the indicator be active while the command the button triggers is executing, and we want it to stop when the command stops. So we get a new signal to help us.
1 2 3 4 5 6 7 8 9 | |
We make use of the command again, but this time we want to watch its ‘executing’ property. So we use the RACable macro, which is just like RACAbleWithStart except it does not send the starting value, it waits for a value to be sent to it first before sending a next event. Then we use subscribeNext: on the new signal and start or stopp the activity indicator depending on the value it sends, which will be YES when the command starts executing, and NO when it stops. Notice again the use of the @strongify macro, since we are referring to self inside the block.
And thats it! Now the app reacts in real-time to all of the users input, and gives the user feedback for every action. And all this with barely over 100 lines of code! All the code show here is available on GitHub. It is part of a larger project that shows different uses of ReactiveCocoa. You can get see all the code from this tutorial by looking at the “Text Fields” example.
Not only does ReactiveCocoa provide you with incredibly easy methods for creating, well, reactive apps, but it also provides the ability to write declarative code that more clearly communicates your intent and generates less errors. Personally, I think that ReactiveCocoa is the future of Cocoa programming, and with ReactiveCocoa 2.0 right around the corner, now is as good a time as any to jump on the train.